
How to replace and fit a new cue tip to your snooker or pool cue.

There are many types of cue tips available to player these days which come in all sizes and prices. However, it does not matter how much you pay for the tip, it will not play very well if it is not fitted correctly.It is not difficult to fit a cue tip but we have seen some customers who have made a bit of a mess of doing the job and in some cases damaged their cue by getting glue all over it and denting the shaft by using un-neccessary cue clamps.
By following the instructions below carefully you will be able to fit a tip to your cue which will play well, and not fall off after a few shots.

As we have previously mentioned in our coaching DVD’s, the tip is the only part of the cue permitted to strike the cue-ball, so it is one of the most important parts of the cue. There are many different kinds of tips, but we recommend `Blue Diamond` or `Elkmaster`, both are good quality tips which will hold the chalk well, and also `bite` into the cue for the more difficult `Side` and `Backspin` shots.
On many of the cheaper cues, the tips are hard and you will not be able to get the same ball control, so one of the first things you can do to improve your cue action and win more matches is to change the tip. We often get asked for advise on how to do this, so we have included below some simple instructions. There is more then one way to re-tip a cue, some players use `cue clamps`, but beware, some clamps can damage your shaft, and they are not really necessary, so our instructions below does not include them.
1. What you will need; A sharp knife, a piece of sandpaper, some glue. With regards the glue, we supply `Tweetens` tip glue if you prefer, but to be honest, we fit hundreds of tips and use Loctite Super Glue. If you can find the `gel` format it will be easier to apply, and will help avoid putting on too much which might soak into the leather tip and make it harder then it should be.
2. Remove the tip with a sharp knife and rub the top of the ferule with some sandpaper so remove any of the old tip and leave a good surface to apply the new tip to. Try not to use a file in case you file the brass ferrule at an angle. (See fig’s 1 and 2)
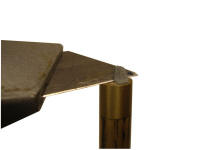
Fig 1 – Cut off tip

Fig 2 – Clean ferule
3. Rub the part of tip you are going to glue (flat part) gently on the sandpaper to make sure it is nice level and clean for glue application.
4. Apply the glue to the top of the ferrule on the shaft, and spread so that it covers the full surface. (See fig’ 3)

Fig 3 – Apply Glue
5. Apply the tip centrally so that part of the tip is overlapping the ferrule. (See fig’ 4)

Fig 4 – Position cue tip
6. Turn upside-down and apply some pressure for about a minute. Do not do this on a good surface like a kitchen top, but on a small piece of wood. The wood will also be useful when we trim the tip later. If you are not in a particular hurry you can leave the tip for a while for the glue to set fully, but it should be okay to trim sooner if needed. Very often we have to trim the tip within a couple of minutes because customers are waiting.
7. Turn the shaft upside down and with the sharp knife cut a slice with the side of the knife against the ferrule. Turn the shaft around very slightly with each cut to take off a small piece at a time. This way the tip will fit your cue perfectly. Be careful not to cut into the shaft or ferrule when trimming tip. (See fig’ 5)

Fig 5 – Cut cue tip
8. Smooth off with the sandpaper and dome to your required (or favoured) shape. The picture in fig’ 6 below shows the most commonly shaped tip, but some players do play with `mushroom shaped` tips, which leave part of the tip overlapping, similar to fig’ 4.

Fig 6 – Finished cue tip
You can use sandpaper to shape the tip, or you can buy one of our tip shapers like the one below by clicking here.

Tip file for snooker and pool cues